

Setting up a WordPress redirect correctly takes about five minutes, but getting it wrong can cost you rankings, break user journeys, and create redirect loops that take far longer to fix. This guide walks you through every method available in 2026, from the quickest plugin-based approach to manual server-level rules, so you can choose the right technique for your situation and implement it with confidence.
WordPress redirects fall into a few clear categories: permanent 301 redirects, temporary 302 redirects, and several less common types. For most site owners, the 301 is the one that matters most. It tells search engines the move is permanent, passes link equity to the new URL, and prevents 404 errors from accumulating. The steps below cover each method in full, including how to test your redirects and fix the problems that trip people up most often.
What you need before creating redirects
Before you touch any redirect settings, take a full backup of your WordPress site. This is non-negotiable. A single syntax error in an .htaccess file can make your entire site inaccessible, and a backup gives you a fast recovery path. Use a plugin like UpdraftPlus or your hosting provider’s built-in snapshot tool.
You also need to identify the correct redirect type for your situation. The most important distinction is between 301 and 302. A 301 redirect is permanent: search engines update their index, link equity transfers to the new URL, and the old address is effectively retired. A 302 redirect is temporary: search engines keep the original URL indexed and do not transfer ranking signals. Using a 302 for a permanent move is one of the most common SEO mistakes WordPress site owners make.
Common scenarios that require a WordPress redirect include:
- Changing a post or page slug after it has been published
- Deleting or consolidating pages, posts, or product listings
- Migrating from HTTP to HTTPS
- Moving your site to a new domain
- Restructuring your permalink format or category taxonomy
One technical prerequisite to check: the .htaccess method covered later in this guide only works on Apache and LiteSpeed servers. If your hosting provider runs Nginx, the .htaccess file does not exist. In that case, use the plugin method or contact your host about their server-level redirect tools. You can confirm your server type inside your hosting control panel.
Set up redirects using a WordPress plugin
A redirect plugin is the fastest and most accessible method for most WordPress users. You get a visual interface, automatic 404 tracking, and no risk of breaking server configuration files. Three plugins cover the majority of use cases.
Option 1: Redirection (free)
The Redirection plugin by John Godley is the most widely used standalone redirect manager for WordPress, with over two million active installs. It is completely free with no premium tier.
After adding the redirect, the Redirection plugin logs it in the table below. You can verify it is active by checking the status indicator next to the rule. Redirection also monitors permalink changes automatically: when you update a post slug, it creates the redirect for you without any manual input. The plugin can also export redirect rules to an .htaccess or Nginx configuration file if you want to move them to the server level later.
Option 2: WP SEO AI
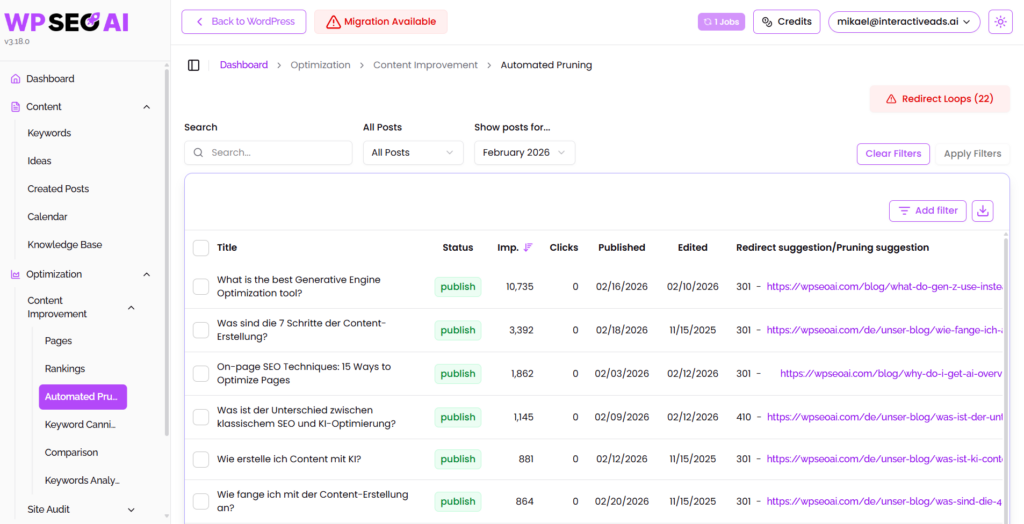
WP SEO AI includes a built-in redirect manager that goes beyond standard plugin functionality by integrating directly with Google Search Console
This makes it possible to manage redirects based on actual performance data rather than guesswork. You can detect low-performing pages and redirect them to stronger alternatives, issue 410 responses for pages with no suitable replacement, and identify keyword cannibalization across your site. The redirect manager supports both 301 and 410 status codes and is available as part of the WP SEO AI platform alongside its broader suite of technical SEO and content tools.
Option 3: All in One SEO (AIOSEO)
All in One SEO includes a full redirect manager as part of its SEO toolkit, starting at around €49 per year. Its key advantage over the free Redirection plugin is that it writes rules directly to your .htaccess file, so redirects are processed at the server level without loading WordPress first. This makes it significantly faster for high-traffic pages. The setup process is similar: navigate to All in One SEO > Redirects, add your source and target URLs, and save.
Option 4: Rank Math or Yoast SEO Premium
If you already use Rank Math or Yoast SEO Premium for your broader SEO workflow, both include built-in redirect managers. In Rank Math, you need to enable the Redirections module under Rank Math > Dashboard > Modules before it appears in the menu. Yoast SEO Premium automatically prompts you to create a redirect whenever you move or trash a piece of content, which is particularly useful for editorial teams managing large volumes of pages.
Add redirects manually via .htaccess
The .htaccess method processes redirects at the Apache server level, before WordPress even loads. This makes it the fastest option for performance-sensitive sites and the right choice for large-scale migrations. It requires direct file access, so connect to your server via FTP or your hosting file manager before proceeding.
The .htaccess file lives in the root directory of your WordPress installation, typically inside the public_ folder. Before editing it, download a copy as a backup.
- Open the .htaccess file in a plain text editor.
- Locate the line that reads
RewriteEngine On. If it is not present, add it inside an<IfModule mod_rewrite.c>block. - Add your redirect rules above the
# BEGIN WordPressline, not below it. Rules placed below that marker can be overwritten when WordPress regenerates the file. - Save the file and upload it back to your server.
For a simple single-page redirect, use this syntax:
Redirect 301 /old-page. https://www.yourdomain.com/new-page.
For pattern-based redirects (for example, redirecting an entire directory), use a RewriteRule instead:
RewriteRule ^old-directory/(.*)$ /new-directory/$1 [R=301,L]
The Redirect directive is simpler and works well for one-to-one URL changes. RewriteRule uses regex pattern matching and handles more complex scenarios, such as migrating an entire folder structure. A useful note from the official WordPress developer documentation: if your .htaccess file is missing entirely, you can regenerate it by going to Settings > Permalinks and clicking Save Changes without changing anything.
If your server runs Nginx rather than Apache, this method does not apply. Nginx does not use .htaccess files. Contact your hosting provider for guidance on adding redirect rules to your Nginx configuration.
Create redirects with WordPress functions.php
The functions.php method uses WordPress’s native wp_redirect() function to create conditional redirects based on page slugs, user login status, query parameters, or any other PHP-accessible condition. This approach suits developers who need granular control that a plugin or .htaccess rule cannot provide.
Always make this edit in your child theme’s functions.php file, not the parent theme. Parent theme files are overwritten on every theme update. The child theme’s functions.php loads in addition to and before the parent’s, so your code persists safely through updates.
- Open your child theme’s functions.php file via Appearance > Theme File Editor or via FTP.
- Add the following code, replacing the slugs with your actual old and new page slugs:
function redirect_old_urls() {
    wp_redirect( home_url( 'new-page-slug' ), 301 );
  }
add_action( 'template_redirect', 'redirect_old_urls' );
Several details in this code matter. The function is attached to the template_redirect action hook, which fires before any HTML is sent to the browser. Calling wp_redirect() after output has already started causes a “headers already sent” error. The default status code for wp_redirect() is 302, so passing 301 as the second argument is required for a permanent redirect. The exit() call after the redirect is also essential: without it, PHP continues executing and may cause unexpected behavior.
When the destination URL is not hard-coded (for example, when it comes from a database value or user input), use wp_safe_redirect() instead. This function validates that the destination belongs to your own domain, preventing open redirect vulnerabilities where an attacker could redirect users to an external malicious site.
Test your redirects are working correctly
Testing is the step most people skip, and it is where problems surface before they affect real users or search engine crawlers. After setting up any WordPress redirect, verify it with at least two methods: a manual browser check and an HTTP status checker.
- Open the old URL in a private or incognito browser window. Confirm it loads the correct destination page.
- Use an HTTP status checker to confirm the response code. Tools like Kinsta’s HTTP Status and Redirect Checker or httpstatus.io show you the exact status code (301, 302, etc.) and whether there are any intermediate redirect hops in the chain.
- Check for redirect chains: the old URL should resolve to the final destination in a single hop, not pass through multiple intermediate URLs.
One useful tip from the Safe Redirect Manager plugin’s documentation: test your redirect as a 302 first, confirm it works correctly, then change it to 301. Browsers cache 301 redirects aggressively, which means a misconfigured permanent redirect can be difficult to undo from a visitor’s perspective even after you fix it on the server.
For bulk testing after a migration, Screaming Frog can crawl up to 500 URLs and report the status code, response URL, and any redirect chains for each one. Google Search Console also surfaces redirect errors and 404s in its Coverage and Pages reports, making it a reliable ongoing monitor after any significant site restructure.
Fix common WordPress redirect problems
The most common redirect problem in WordPress is the ERR_TOO_MANY_REDIRECTS error, also called a redirect loop. The browser keeps following redirects in a circle and eventually gives up. Here is how to diagnose and fix it systematically.
- Clear your browser cache and cookies. A cached redirect can make a fixed problem appear to persist. Start here before investigating server-side causes.
- Clear your WordPress cache. If you use a caching plugin like WP Rocket or W3 Total Cache, flush it. CDN caches (such as Cloudflare) also need to be purged.
- Check your WordPress URL settings. Go to Settings > General and confirm that the WordPress Address and Site Address fields match exactly, including the protocol (http or https).
- Deactivate all plugins. Via FTP, rename the
/wp-content/pluginsfolder to something likeplugins_old. If the loop stops, a plugin conflict is the cause. Rename the folder back and reactivate plugins one by one to isolate the culprit. - Reset your .htaccess file. Connect via FTP, rename the current .htaccess to
.htaccess_old, and reload the site. If the loop stops, the .htaccess file contained conflicting rules. Regenerate a clean version via Settings > Permalinks > Save Changes.
A common SSL-related loop occurs when Cloudflare is set to “Flexible” SSL mode. In this configuration, Cloudflare connects to your origin server over HTTP, your server redirects to HTTPS, Cloudflare tries HTTP again, and the loop repeats indefinitely. The fix is to set Cloudflare’s SSL/TLS mode to “Full” or “Full (Strict)” in your Cloudflare dashboard.
Two other common issues are worth flagging. First, avoid managing redirects in both a plugin and .htaccess simultaneously. Overlapping rules from two sources frequently conflict. Choose one method and stick to it. Second, check trailing slashes: WordPress typically enforces a trailing slash on URLs, so a redirect rule written for /old-page may not fire if the incoming request arrives as /old-page/. Test both variations to confirm your rule handles both formats.
Manage redirects for SEO and site performance
Redirects are not just a technical fix: they are an active part of your SEO strategy. A well-managed redirect preserves link equity from external sites pointing to old URLs, prevents 404 errors from accumulating, and consolidates ranking signals onto the correct pages. A poorly managed redirect setup does the opposite.
The most important SEO principle for WordPress redirects is to keep chains short. Each hop in a redirect chain adds an extra HTTP request, increases page load time, and dilutes the link equity passing through the chain. Google recommends keeping chains to a maximum of three consecutive redirects, but the target should be one direct hop from old URL to final destination. After any site migration, update your internal links to point directly to the new URLs rather than relying on redirects to bridge the gap.
Performance also depends on where the redirect is processed. Plugin-level redirects require WordPress to load PHP, query the database, and initialize all active plugins before checking whether a redirect applies. Server-level redirects in .htaccess or Nginx configuration happen before WordPress loads at all, which can save hundreds of milliseconds per request. For a handful of redirects on a low-traffic site, the difference is negligible. For high-traffic pages or large-scale migrations, server-level rules are the better choice.
Key SEO best practices to follow after setting up redirects:
- Always use 301 for permanent moves. Never use a 302 where a 301 is appropriate.
- Do not redirect all 404 errors to your homepage. Redirect each broken URL to the most relevant existing page instead.
- Update your XML sitemap to contain the new URLs, not the old ones. Sitemaps that list redirected URLs waste crawl budget.
- Monitor Google Search Console for crawl errors and sudden drops in indexed pages after any migration or restructure.
- Audit your redirects periodically using Screaming Frog or your redirect plugin’s built-in tools to identify chains, loops, and outdated rules that can be cleaned up.
Managing redirects at scale becomes significantly easier when your SEO workflow includes automated monitoring. The WPBeginner redirect guide is a solid reference for the fundamentals, and tools like WP SEO AI’s technical audit capabilities can surface broken links and redirect chains automatically as part of your ongoing site health monitoring, so problems are caught before they affect rankings.
This content was generated with the help of AI and it may contain mistakes